LXC: Difference between revisions
imported>Lmperry No edit summary |
imported>Lmperry No edit summary |
||
| (30 intermediate revisions by 2 users not shown) | |||
| Line 1: | Line 1: | ||
<span style="color:red">'''IMPORTANT UPDATE: This system is scheduled to be retired June 2021. Please plan accordingly.''' </span> | |||
The CNI has received funding from [http://biox.stanford.edu/biox/neuro.html BIO-X Neuroventures] for a high-powered compute server which will be used to provide computational resources to CNI users. | The CNI has received funding from [http://biox.stanford.edu/biox/neuro.html BIO-X Neuroventures] for a high-powered compute server which will be used to provide computational resources to CNI users. | ||
== Accounts == | == Accounts == | ||
LXContainers and accounts are created based upon scanning group membership. If you would like an account or an LXC setup for your group, please contact us. | LXContainers and accounts are created based upon scanning group membership. Authentication uses the Stanford kerberos server, so you log in securely using your normal SUNet username and password. | ||
If you would like an account or an LXC setup for your group, please contact us. | |||
== Logging in == | |||
You can log in to your CNI LXContainer using SSH or [http://cni.stanford.edu/wiki/LXC#Remote_Desktop remote desktop]. You will have to be on the Stanford Network or logged in to the [https://itservices.stanford.edu/service/vpn Stanford VPN] to get access. | |||
For ssh: | |||
ssh -XY [YOUR_SUNetID]@[YOUR_CONTAINER_NAME].stanford.edu | |||
== Data access == | == Data access == | ||
Users can access their data from NIMS using NIMSfs. All your NIMS data are available in /nimsfs. This means you don't need to download anything. Once you log in to your CNIC there should be a link to /nimsfs on your desktop. | Users can access their data from NIMS using NIMSfs. All your NIMS data are available in /nimsfs. This means you don't need to download anything. Once you log in to your CNIC there should be a link to /nimsfs on your desktop. | ||
Note that NIMSfs is a read-only filesystem, so you can't save anything there. | Note that NIMSfs is a read-only filesystem, so you can't save anything there. Also, full NIMS access control applies. So, you can give someone an account on your lxc (e.g., an RA) and use the NIMS web interface to define which datasets they will see in nimsfs when they log in to the container. | ||
All analysis should be done and results saved to the scratch folder located at /data (a link can be found on each user's desktop.) | All analysis should be done and results saved to the scratch folder located at /data (a link can be found on each user's desktop.) | ||
If you want convenient access to the raw data, or to organize it in the analysis dirs in /data, you can use sym-links rather than copying the raw data. E.g., | If you want convenient access to the raw data, or to organize it in the analysis dirs in /data, you can use ''sym-links'' rather than copying the raw data. E.g., | ||
ln -s /nimsfs/[group]/[experimentName]/[session]/ foo_sub001 | ln -s /nimsfs/[group]/[experimentName]/[session]/ foo_sub001 | ||
Or if you just want to copy some data to your own machine, you can use scp. E.g.: | |||
scp -r [YOUR_SUNetID]@[YOUR_CONTAINER_NAME]:/nimsfs/[group]/[experimentName]/[session]/ . | |||
(Remember-- you '''must''' be on the Stanford network to access your container. If you are off campus, use the [https://itservices.stanford.edu/service/vpn Stanford VPN].) | |||
'''Also note that the CNI containers are not backed up at the moment. It's an SSD-based RAID system, so should be reasonably reliable, but it would be wise to keep backups of anything not easily recomputed.''' | |||
However, the data in nimsfs are quite secure on our highly-redundant RAID server with off-site backups to another highly redundant RAID file server. That said, the nimsfs window into the CNI data archive may seem a little quirky due to it being a fusefs virtual file system. But the data in there should never go away, so if anything seems odd (like missing files) just let us know. | |||
One last thing about nimsfs- by default, all raw data are hidden. E.g., if you run the scp command listed above you will only get niftis, QA reports, and physio files (if you recorded physio). You won't get tarballs of dicoms, p-files, or the nims image viewer pyramid files (since you will rarely need those). But if for some reason you do want access to any of these files, have a look in /nimsfs/raw/. | |||
== Scratch Space == | |||
Each CNI Container comes with a '/data/' directory - which contains your groups' home directories, as well as a freesurfer directory. Users can create directories within /data to use as scratch as follows | |||
mkdir /data/scratch | |||
''The space in this directory is shared and limited. Please do not depend on this for backing up data or storing irreplaceable data. '' | |||
== Software == | == Software == | ||
Each LXC has the following software pre-installed <em>(from NeuroDebian wherever possible):</em> | Each CNI LXC (CNIC) runs Ubuntu 14.04 and has the following software pre-installed <em>(from NeuroDebian wherever possible):</em> | ||
* Freesurfer (v5.3.0) | * Freesurfer (v5.3.0) | ||
* fsl mrtix afni octave ants itksnap ipython1x python-numpy python-scipy python-nipype python-nibabel python-dipy python-nitime python-nipy mricron mriconvert gifti-bin dicomnifti nifti2dicom qnifti2dicom | * fsl mrtix afni octave ants itksnap ipython1x python-numpy python-scipy python-nipype python-nibabel python-dipy python-nitime python-nipy mricron mriconvert gifti-bin dicomnifti nifti2dicom qnifti2dicom | ||
If specific software is required please contact us. | If specific software is required please contact us. | ||
== Hardware == | == Hardware == | ||
The machine which hosts the | The machine which hosts the containers boasts 768 GB of RAM and 4X Intel(R) Xeon(R) CPU E5-4650 processors, with a total of 32 cores (64 threads). Each LXC will be configured to match specific needs for processing. But because of the way that LXC works, you can take full advantage of all the cores when no other users are using the system. | ||
== Remote Desktop == | |||
All CNI containers run XRDP and XFCE4-Desktop. Our preferred method for connecting to your container is to use Microsoft Remote Desktop. | |||
Microcoft Remote Desktop Client can be downloaded from: | |||
* The [http://itunes.apple.com/us/app/microsoft-remote-desktop/id715768417?mt=12 App Store on OSX ] | |||
* The [http://apps.microsoft.com/windows/en-us/app/remote-desktop/051f560e-5e9b-4dad-8b2e-fa5e0b05a480 Microsoft website] for windows users. | |||
* Linux users can install 1) Remmina 2) Remote Desktop Viewer or 3) KVnc using 'apt-get install'. | |||
Once you have your client downloaded, start it and configure a new session given your cnic-number accordingly. See the example below for cnic1: | |||
== Remote Desktop | <gallery widths=175px heights=175px> | ||
File:mrdp.png | Microsoft Remote Desktop | |||
File:Cnic_rdp_config.png | Session Configuration | |||
File:Cnic_desktop.png | The CNIc Desktop | |||
</gallery> | |||
== | == OpenNX == | ||
We have configured the CNICs to use FreeNX. FreeNX is a system that allows a user to access the desktop of their CNIC from another machine over the Internet. You can use this to login graphically to your CNIC desktop from a remote location. Users that want access to a desktop session on their CNIC should follow directions below to install and configure the OpenNX client, which works hand-in-hand with FreeNX. | '''NOTE: We prefer you to use the remote desktop method described above - if you still prefer openNX, then go ahead...'''' We have configured the CNICs to use FreeNX. FreeNX is a system that allows a user to access the desktop of their CNIC from another machine over the Internet. You can use this to login graphically to your CNIC desktop from a remote location. Users that want access to a desktop session on their CNIC should follow directions below to install and configure the OpenNX client, which works hand-in-hand with FreeNX. | ||
===OpenNX Client=== | ===OpenNX Client=== | ||
| Line 105: | Line 142: | ||
File:opennx10.png | 2. Resume Session Dialog | File:opennx10.png | 2. Resume Session Dialog | ||
</gallery> | </gallery> | ||
==Allocated Containers== | |||
* cnic0: template | |||
* cnic1: CNI | |||
* cnic2: McClure Lab | |||
* cnic3: Gross Lab | |||
* cnic4: Wandell Lab | |||
* cnic5: McClelland Lab | |||
* cnic6: Grill-spector Lab | |||
* cnic7: Gardner Lab | |||
* cnic8: Zaki Lab | |||
* cnic9: Wagner Lab | |||
Latest revision as of 18:53, 9 October 2020
IMPORTANT UPDATE: This system is scheduled to be retired June 2021. Please plan accordingly.
The CNI has received funding from BIO-X Neuroventures for a high-powered compute server which will be used to provide computational resources to CNI users.
Accounts
LXContainers and accounts are created based upon scanning group membership. Authentication uses the Stanford kerberos server, so you log in securely using your normal SUNet username and password.
If you would like an account or an LXC setup for your group, please contact us.
Logging in
You can log in to your CNI LXContainer using SSH or remote desktop. You will have to be on the Stanford Network or logged in to the Stanford VPN to get access.
For ssh:
ssh -XY [YOUR_SUNetID]@[YOUR_CONTAINER_NAME].stanford.edu
Data access
Users can access their data from NIMS using NIMSfs. All your NIMS data are available in /nimsfs. This means you don't need to download anything. Once you log in to your CNIC there should be a link to /nimsfs on your desktop.
Note that NIMSfs is a read-only filesystem, so you can't save anything there. Also, full NIMS access control applies. So, you can give someone an account on your lxc (e.g., an RA) and use the NIMS web interface to define which datasets they will see in nimsfs when they log in to the container.
All analysis should be done and results saved to the scratch folder located at /data (a link can be found on each user's desktop.)
If you want convenient access to the raw data, or to organize it in the analysis dirs in /data, you can use sym-links rather than copying the raw data. E.g.,
ln -s /nimsfs/[group]/[experimentName]/[session]/ foo_sub001
Or if you just want to copy some data to your own machine, you can use scp. E.g.:
scp -r [YOUR_SUNetID]@[YOUR_CONTAINER_NAME]:/nimsfs/[group]/[experimentName]/[session]/ .
(Remember-- you must be on the Stanford network to access your container. If you are off campus, use the Stanford VPN.)
Also note that the CNI containers are not backed up at the moment. It's an SSD-based RAID system, so should be reasonably reliable, but it would be wise to keep backups of anything not easily recomputed.
However, the data in nimsfs are quite secure on our highly-redundant RAID server with off-site backups to another highly redundant RAID file server. That said, the nimsfs window into the CNI data archive may seem a little quirky due to it being a fusefs virtual file system. But the data in there should never go away, so if anything seems odd (like missing files) just let us know.
One last thing about nimsfs- by default, all raw data are hidden. E.g., if you run the scp command listed above you will only get niftis, QA reports, and physio files (if you recorded physio). You won't get tarballs of dicoms, p-files, or the nims image viewer pyramid files (since you will rarely need those). But if for some reason you do want access to any of these files, have a look in /nimsfs/raw/.
Scratch Space
Each CNI Container comes with a '/data/' directory - which contains your groups' home directories, as well as a freesurfer directory. Users can create directories within /data to use as scratch as follows
mkdir /data/scratch
The space in this directory is shared and limited. Please do not depend on this for backing up data or storing irreplaceable data.
Software
Each CNI LXC (CNIC) runs Ubuntu 14.04 and has the following software pre-installed (from NeuroDebian wherever possible):
- Freesurfer (v5.3.0)
- fsl mrtix afni octave ants itksnap ipython1x python-numpy python-scipy python-nipype python-nibabel python-dipy python-nitime python-nipy mricron mriconvert gifti-bin dicomnifti nifti2dicom qnifti2dicom
If specific software is required please contact us.
Hardware
The machine which hosts the containers boasts 768 GB of RAM and 4X Intel(R) Xeon(R) CPU E5-4650 processors, with a total of 32 cores (64 threads). Each LXC will be configured to match specific needs for processing. But because of the way that LXC works, you can take full advantage of all the cores when no other users are using the system.
Remote Desktop
All CNI containers run XRDP and XFCE4-Desktop. Our preferred method for connecting to your container is to use Microsoft Remote Desktop. Microcoft Remote Desktop Client can be downloaded from:
- The App Store on OSX
- The Microsoft website for windows users.
- Linux users can install 1) Remmina 2) Remote Desktop Viewer or 3) KVnc using 'apt-get install'.
Once you have your client downloaded, start it and configure a new session given your cnic-number accordingly. See the example below for cnic1:
-
 Microsoft Remote Desktop
 -
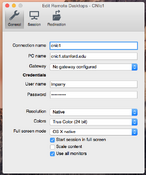 Session Configuration
 -
 The CNIc Desktop


OpenNX
NOTE: We prefer you to use the remote desktop method described above - if you still prefer openNX, then go ahead...' We have configured the CNICs to use FreeNX. FreeNX is a system that allows a user to access the desktop of their CNIC from another machine over the Internet. You can use this to login graphically to your CNIC desktop from a remote location. Users that want access to a desktop session on their CNIC should follow directions below to install and configure the OpenNX client, which works hand-in-hand with FreeNX.
OpenNX Client
Software dependencies
Before installing the opennx client you will need to install an X Window System for your specific operating system.
- Windows
- Install Xming from the Xming project page
- PennState has a useful install guide which you can refer to if you need help.
- OSX
- Install Xquartz from the Xquarts project page.
- Follow the typical installation procedure
- Linux
- Most linux clients will have an X Window System installed by default.
Client installation
To install the OpenNX client on Windows, OSX, or Linux:
- Download the client from opennx.net
- Follow typical installation procedures
Client configuration
Before you can use the OpenNX client you must configure the connection to the CNIC - which will refer to in the following directions as 'CNIC' - please check your LXC name before you follow these instructions.
- Run the OpenNX Connection Wizard > Click 'Next'
- Enter a session name and host name NOTE: The session name is arbitrary and meant to help you remember a given session, however, the Host is important and must be the hostname that was provided to you by the CNI when your LXC was configured.
- Select the appropriate internet connection type for your configuration (usually WAN or LAN).
- Hit Next
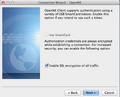
- Choose 'Custom' for the X Desktop >> then click on "Settings"
- In the Session Settings window > Choose 'Run the following command' and enter 'startxfce4' as the command > Under Options, choose 'New Virtual Desktop'
- Back in the Wizard Choose 'Available Area' for size of desktop and click 'Next'
- Make sure 'Enable SSL encryption of all traffic' is selected > Click 'Next'
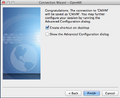
- Choose to create a shortcut on your desktop for this connection > Click 'Finish'
- OSX users might experience a crash of the Wizard when you click finish - this will not affect the creation of the session. Simply click 'Ignore'
-
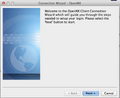 1. The connection wizard
 -
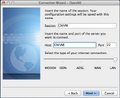 2. Session Configuration
 -
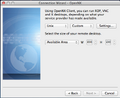 3. Desktop Configuration
 -
 4. Desktop Settings Configuration
 -
 5. Connection Wizard
 -
 6. Connection Wizard


Session Initialization
To initialize a previously configured session
- Start the OpenNX client
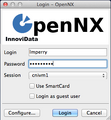
- Choose your session from the session dropdown list
- Enter your login credentials > Username and Password
- Click > 'Login'
- You will likely see messages about accepting and saving host information. Choose 'yes' for each window that appears and 'don't show again' as appropriate.
- If all goes well, you should now see your desktop
- OSX users will get a warning message about /usr/sbin/cupsd and execution permissions. If you'd like to avoid this warning you can make the executable "more" executable by running the following line in Terminal: sudo chmod ga+x /usr/sbin/cupsd
-
 1. Login Window
 -
 2. XUBUNTU Desktop


Session Management
Depending on your workflow you might want to return to a session if some work is still ongoing. OpenNX allows you to resume your session if you disconnect from it, or if it was unexpectedly terminated. Of course, you can also end your session once you are done working on a project.
Ending a session
- There are a couple of ways to end a session
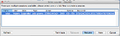
- Clicking Close: Click the close button for the x-window > You will then be prompted with the window in figure 1 below. From here you can select to either "Disconnect" or "End" your session. Clicking "End" will close the session and stop all your running jobs and close all your windows. The next time you login you will have a "fresh" working state.
- Shutdown": From within the XUBUNTU desktop Choose > Shutdown and click yes when prompted to shutdown the computer >> This will not actually shutdown the computer, just your session.
Disconnecting and resuming a session
- If you would like to continue working on your session at a later time, then you want to simply disconnect from it and reconnect later. Follow the steps below.
- Click the close button for the x-window OR close your X Window (xming or Xquartx)
- You will then be prompted with the window in figure 1 below. From here you can select to either "Disconnect" or "End" your session. Clicking "Disconnect" will allow you to reattach to your session at a later time. This allows you to save your state and not have jobs or windows close when you stop your session.
- Reattaching: Open an OpenNX session as described in the previous section - choose the session you wish to resume and click "Resume"
-
 1. Session End / Disconnect
 -
 2. Resume Session Dialog

Allocated Containers
- cnic0: template
- cnic1: CNI
- cnic2: McClure Lab
- cnic3: Gross Lab
- cnic4: Wandell Lab
- cnic5: McClelland Lab
- cnic6: Grill-spector Lab
- cnic7: Gardner Lab
- cnic8: Zaki Lab
- cnic9: Wagner Lab